Solving Major Behavioral Problems in Thirty Seconds
by Marty McGee Bennett
Camelidynamics
I am only partly kidding. If you haven’t paid very close attention to halter fit and you are having trouble with one of your alpacas, you may be able to solve the problem in thirty seconds.
I have worked with hundreds of difficult alpacas that were difficult only because they were in fear for their lives every second they wore a halter. I have seen problems from kicking to kushing evaporate because I changed or adjusted a badly fitting halter.
Red, blue, black, brown, polypropylene, nylon, leather, X-style fixed nose band, three way adjustable, there are a lot of halters to choose from. It is CRITICAL you understand and appreciate how important halter fitting is to your alpaca. Your success as a handler and trainer depends on it. Paying attention to halter fit is easy, and there are few other changes that can make such an immediate and dramatic difference in behavior.
The issue is not only what type of halter you select, but how it fits. Many owners believe that if a halter can be attached to the alpaca’s head– it fits. NOTHING could be further from the truth.
Alpacas are semi-obligate nasal breathers. This means that they CANNOT survive if forced to breathe solely through their mouths. Anything that compromises the nostrils or the nasal passages is not only uncomfortable, it is life threatening. When compared to other animals the nose bone in camelids is comparatively short and drops off sharply. (See photo of skull.)
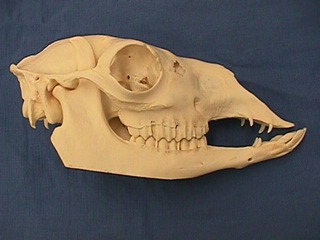
Notice how sharply the nose bone drops off. Not all skulls are exactly the same. It is a good idea to palpate the nose of your animal so you know for sure where the cartilage begins. It is critical that a halter never slide down off the nose bone and into the area of cartilage.
Add this to the awesome leverage that a camelid’s long neck affords, and it is easy to understand why alpacas are often reluctant to allow us to halter them. Haltering and halter fitting is further complicated by a camelid’s horizontal head set. Because an alpaca carries his head with the nose oriented horizontally rather than vertically (like a horse) a halter that slips off the bone must literally overcome gravity to return to its original position.
The Elements of Halter Fit: The Big Three
Safety:
A properly fitted halter’s nose band not only rests on the bone but stays there NO MATTER WHAT. It isn’t enough for the halter to start out on the nose bone, it must stay there when the animal pulls back, bucks, rolls, grazes, steps on his lead rope, breaks away from the handler dragging his lead, or scratches his face with his foot. The smaller the animal the shorter the nose bone and the trickier he is to properly fit.
It is particularly important to understand the dynamics of halter fit if you intend to use your halter for any type of restraint. It is incredibly frightening for an animal to be tied or restrained, in a halter that feels as if it could slip off the nose bone. Imagine how you would feel with your feet tied to the bottom of a swimming pool with just enough of your nose above water to barely get a breath. This experience might give you some idea of what it is like for an alpaca to wear a badly fitting halter in a restraint chute. Animals that have been restrained in an ill-fitting halter never forget the experience.
Comfort:
Preventing harm to your camelid is the highest priority of halter fit. From your alpaca’s point of view the second most important aspect of wearing a halter is comfort. Your alpaca should be able to do everything with his halter on that she does with her halter off. These activities would include eating and grazing, ruminating and yawning.
Well fitting halters do not rub raw spots or create calluses on your animal’s head even if left on for a few days. Once the halter is adjusted properly your alpaca should quickly forget that it is even there until you use it to communicate with him.
Effectiveness:
The halter is the most important piece of equipment you own. Horse people have a variety of tools to communicate with their horses. They have a choice of bits and other tack as well as their legs and seat with which to signal their requests. Essentially alpaca trainers have a halter and a lead rope. It only makes sense to select a halter that is truly effective as a tool of communication.
Types of Halters:
When the camelid phenomenon first began, it was a challenge to find a halter–any halter–that would remotely fit a camelid. Many people had their own halters made or used modified sheep or foal halters. Now the reverse is true. It is just as frustrating these days to pick and choose from all the types of halters available. There are three types of halters with variations on these basic themes: fixed nose band, x-style and adjustable.
Fixed nose band:
This type of halter features a continuous loop for the nose band that cannot be adjusted. The crown piece may be adjusted but any variation in the nose band is achieved only by changing to a different halter in a different size.
X-style halter:
A halter in which the crown piece and the nose band form a continuous loop. It is not possible with an X-style halter to adjust the nose band and the crown piece independently from one another. Loosening the crown piece provides slack in the nose band; tightening the crown piece takes up slack in the nose band
Adjustable Halters:
These halters feature adjustability in both the crown piece and the nose band. These two elements can be adjusted independently of one another.
Another important aspect of a halter is the way in which the possible adjustments can be made and how they fasten. Some halters have a slide arrangement others feature buckles and holes and still others use fastex or spring loaded clips. Halters usually come in nylon, leather or polypropylene, in a variety of widths.
I want a halter that is safe, comfortable and is effective as a tool of communication. I use the following criteria to choose a halter that fits this bill:
- I want a halter that has a wide variety of small adjustments and can be adjusted easily without taking the halter off the animal.
- I want a halter with a short cheek piece and one in which the throat latch and the nose band travel through the same ring under the chin. These two features taken together encourage the halter to stay further back on the nose bone where it is safe.
- I want a halter that includes rings on the nose band allowing me to lead from the side ring and increasing the clarity of signal as well as the leverage I have over the animal’s balance.
A two-way adjustable halter–a buckle halter with adjustability in both the crown piece and nose band–meets these criteria better than any other type of halter I have found. The proper halter is one thing, but how you adjust is on your animal is everything. The same halter on the same animal could be safe, comfortable and effective, or it could be unsafe, uncomfortable and useless. The outcome is totally dependent on how the handler adjusts the halter.
X-style halters are fine for animals that already know how to lead. They are usually comfortable and do a good job of staying put on the nose once properly adjusted. They fit a wide variety of animals. On the down side they don’t convey signals from the handler to the animal as well as a halter with an independently adjustable nose band.
I DO NOT like or use halters with fixed nose bands. They are more often than not unsafe, uncomfortable and do a poor job of communication as well. These halters are inexpensive to manufacture and are quite prevalent especially for smaller or young alpacas. This is very unfortunate in that a young alpacas smaller head makes it even more important to have an adjustable nose band.
Putting Your Halter on and Making Adjustments
1. Before putting the halter on the animal adjust the nose band opening so that it is bigger than you think you need. A good rule of thumb is to open the halter to within one or two holes of its largest adjustment. Adjusted this way the nose band will easily slide up the nose close to the eye and will still have slack available. If, on its largest setting the halter will not slide well up on the nose in front of the eye with slack still available, your halter is too small! If there is no slack available when you buckle the crown piece, you are not allowing for normal movement of the jaw or mouth. It is quite common for owners to literally tie their animal’s mouth shut. A nose band that fits this way is usually unsafe as well because it is prevented from sliding all the way up the nose bone.
2. Snug up the crown piece. The crown piece must be tight enough so that the nose band cannot slip off the nose bone–even when significant forward pressure is applied to the nose band.
3. Next, take all extra slack out of the nose band. Leave enough room for your animal to ruminate and eat comfortably.
The most common re-adjustment I make on a halter, which is improperly fitted, is to loosen the nose band significantly and tighten the crown piece to take up the slack. The net effect of these adjustments is to cause the nose band to slide further up toward the nose on firmer bone. From a safety standpoint I would rather err on the side of adjusting the halter too close to the eye and a tad snug in the crown piece than to allow the nose band to slide too far down the nose. This is especially true if your animal has not been led before or you intend to use your halter for staking out, tying or restraint.
Dynamics of adjusting the halter
Many alpaca owners are unaccustomed to seeing a halter nose band this close to the eye and are reluctant to adjust the halter this way. Concern for the eye is misplaced. Once on the face a halter cannot poke an animal in the eye and the graduated shape of the nose prevents the halter from slipping up over the eye.
Halters high up on the nose bone disappear from the animal’s view and are less obtrusive than when they are closer to the front of the nose. In order to be firmly on bone and to be safe the halter must be very close to the eye. This is true for virtually all alpacas. Depending on the size and head shape, many alpacas under four months of age may be too small to wear a halter comfortably. These animals have such a small amount of bone to work with that you must tighten the crown piece up so tightly that the halter is uncomfortable otherwise the halter is unsafe.
I believe that alpacas are distracted and annoyed by halters that rest in what I call the danger zone – the middle area of the nose bone.When the handler puts forward pressure on the halter (as in leading), it feels as if the halter could slip off the bone. The animal is literally waiting for the ax to fall. Animals wearing halters with the nose band in the danger zone may become extremely resistant to wearing a halter, cush when asked to lead, or will bolt or panic suddenly as if for no reason.
When discussing halter fit owners always ask me to quantify how to do it. They want to know how to adjust the halter in terms of numbers of fingers or inches, how much room to leave in the nose band and the crown piece, and where exactly on the nose bone the nose band should rest. I cannot make quantitative guidelines that will work for all animals. You must think about fit proportionately.
The Crown Piece
The adjustment of the CROWN piece is what determines how far the nose band can slip forward. How much room you should leave in the crown piece is totally dependent on the length of the nose bone. This means that the crown piece can be looser on a big headed alpaca than it can be on a small or young alpaca. It also means that a very short nose bone requires a very snug, if not tightly fitting crown piece.
The length of the nose bone is different for adults versus weanlings or babies and for alpaca and alpacas. The portion of the nose bone in front of the eye might be an inch long on a weanling alpaca and 3-4 inches in length on an adult alpaca. Young animals whose heads are simply too small to fit both safely and comfortably in any halter, need to grow some more. I think it is only fair to wait to put a halter on until you can satisfy both requirements.
The length of the nose bone also varies from individual to individual. I have palpated nose bones and found that they were much shorter than I expected them to be. In many cases these alpacas exhibited extreme behavior related to haltering.
Also halters tend to stretch when warmed up by the animal’s body heat changing the way a halter fits. On a big alpaca halter, stretch is of little consequence, but on a weanling alpaca tied to a fence it can be extremely significant.
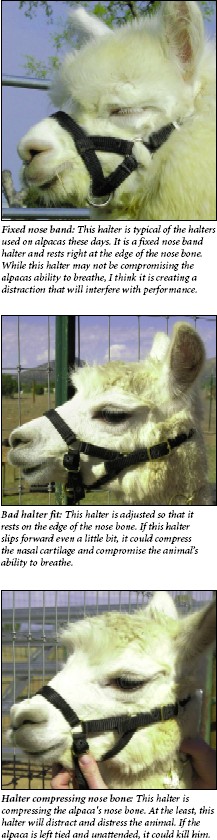
Compare and contrast these two photos. Look at the photo of the skull as you analyze them. The one on the right is well up on the nose bone and fits properly. The halter in the other photo is riding just at the edge of the nosebone and although it looks pretty good a halter fitted this way will distract the llama because it is teetering on the edge of the bone. It is particularly dangerous to use an improperly fitted halter for staking an animal out or for any kind of restraint.
The Nose Band
Adjusting the nose band has far more to do with comfort then it does with safety. The nose band must allow the alpaca enough lateral movement to ruminate, eat and graze unencumbered. Again this varies depending on the size of the animal and his jaw.
Adjusting the halter so that it is close to the eye is not only safer it also means the nose band is much closer to the hinge of the jaw. When the animal chews there is less lateral movement at the hinge of the jaw than at the front of the mouth. Have a look at your animal while he eats. Because of this fact you can snug up the nose band close to the eye a bit more and still leave plenty of room for eating and rumination. A snugger nose band is more effective for communication.
Many people complain that they have a certain alpaca that is much harder to fit–these animals usually have a very steep nose bone and a shorter nose. When haltered in the traditional way the halter slides right down the nose bone like a car on a steep icy hill. Adjusting the halter as I suggest also solves this problem.
The Halter Design
Many halters on the market are not proportioned to be worn as I describe. No matter how hard you try, you won’t be able to adjust them as I have described. This is because the parts of the halter are not the right length. In some cases the nose band is simply not big enough to allow it to be worn close enough to the eye to be safe. Buying a larger halter with more room in the nose band may not solve the problem because the crown piece may be too long. Some halters have a cheek piece that is too long. A long cheek piece causes the crown piece to slip down the neck.
A low crown piece is not unsafe but a halter is most useful for communication when it stays at the poll–immediately behind the ears. With certain halters if you tighten the crown piece so that it is up behind the ears (where it should be), a cheek piece that is stiff and too long forces the nose band down into the danger zone.
Some halters feature a fleece lining under the nose band ostensibly for greater comfort. A fleece lining inside the nose band is no substitute for proper fit. Fleece lining on a nose band that is already too small only makes it tighter and more uncomfortable.
Adjusting a Halter
A properly fitting halter is safe and comfortable. The nose band rests firmly on bone and stays there NO MATTER WHAT. There is enough room in the nose band for the animal to chew without interference.
- Before you put the halter on always open the nose band so that it is larger than you think you need.
- Snug up the crown piece. Tighter for animals with smaller heads
- Take the slack out of the nose band. Larger animals need more room.
- Always carefully examine the nose bone before you put a halter on an animal you don’t know.
- Recheck halter fit after about ten minutes.
If you have doubts about animals you have haltered after reading this article put your current halter on and adjust as usual. Really look at your animal. Does the halter interfere with the freedom of movement in the jaw? Does your alpaca have to struggle to get a mouthful of grain or hay? Do his nostrils flare more with the halter on than off? Take hold of both sides of the nose band of the halter and tug forward. If you can pull the halter forward off the bone, your animal can too and is in danger.
I did a clinic in Alaska some years back. We were working on leading techniques and one of the young males was impossible. He would walk along nice as pie and suddenly for no apparent reason go absolutely bonkers. He was difficult to halter and had a history of this type of behavior on the lead.
I thought the halter fit was marginal, but we were working in a field some distance from the barn. This guy took a while to halter the first time. It was close to the end of the day, and I didn’t want to go to the trouble of taking this alpaca back to the barn and changing his halter. I remember thinking "That alpaca has the brains of a gnat."
He was a young intact male, and I thought he was a nervous, high-strung, alpaca feeling his hormones. I watched as this guy blew up with several different people. I finally decided to take the time to change his halter. When I brought him back after changing his halter the group thought I had switched animals. The behavioral change was unbelievably dramatic. I almost couldn’t believe it. He was a puppy dog on the lead and not only with me. Five or six different people lead him over and under challenging obstacles.
This is one of many examples in my memory of positive behavior changes spurred by the seemingly simple act of equipping your alpaca with a properly fitting halter. If I have scared you about halter fit, it is for good reason. Paying attention to halter fit has a direct impact on the safety of your animals and your success as a handler. Use these guidelines and you can rest easy knowing your alpaca is comfortable and free from danger.
Reproduced from www.camelidynamics.com with permission of Marty McGee Bennett. Copyright © Marty McGee Bennett